Showing posts with label Diy craft. Show all posts

DIY Quick Repair of defective zipper


It happens oftentimes when you're out of town and the zipper of your backpack has defunct unexpectedly or you have favorite jacket, short or pants which has zipper malfunction. If you encounter such situation, do not immediately cast your things into scrap, recycle them  instead.

There are two types of defective zipper: one is non-repairable.
This defect has no other solution than bringing them to a sewer to replace with a new zipper. The zipper is non-repairable if it has missing teeth. The other type of zipper defect is the one which is repairable. When all the  teeth are still intact, the zipper can be repaired easily and quickly.

 The common reason of zipper malfunction is because of a loose slider. A zipper slider is the zipper head with two sides sliding to close a zipper. If it gets too lose, it won't be able to zip a Zipper. It's very simple to repair a lose slider. You just need a pliers to tighten the sides of the slider.

Here's the DIY procedure to quickly repair a zipper.
<img src="zipper 2.gif" alt="defective zipper quick repair, no stitch " />


  • Get a pliers 
  • Tighten the sides of the slider 
  • Then zip and you're done! 


 There's another diy procedure of repairing a worn out zipper. It requires a little stitching but you can do it by following the procedure, please refer to the images.

<img src="zipper.gif" alt="DY quick repair of defective zipper " />

  • First find a used zipper from your old pants, shorts or jacket. 
  • Cut both sides of used zipper 
  • Pull the slider and disjoint from the zipper 
  • Untie the stitch of the top Zipper you wanted to repair( see the images)
  • Insert both sides of zipper to slider as a replacement 
  • Slide down the zipper 
  • Then restore the untied stitch of the pants.
You can use this diy procedure to repair all kinds of zippers. If you find this article helpful, please share!

DIY Tissue Holder made from recycled news paper


Doing simple craft will let you practice your creativity. Using old and used materials is a big help to our environment to reduce wastes. Recycling waste materials gives so much benefits to us and to our mother earth. this is why I am always encouraging everyone to please recycle. Recycling is also a big help to our kids' school project so we can help them to them every time they have to make one. If you're a stage mom like me, I'm sure you're always searching and learning things to teach our kids so I hope this one will benefit moms like me.

A tissue holder is one of the things we needed for maintaining our personal hygiene; a news paper is our daily morning companion to keep us updated everyday. These two can work together to give us a useful handicraft product which concerns our personal care.This project is about making a tissue paper holder from old news paper,  it's an easy DIY craft which you and your kids will enjoy doing together. We can do various crafts with old news papers, in my previous blogs, I wrote tutorials about making different handicrafts using recycled news paper such as: how to make a handbag newspaper and how to recycle newspaper to wedding souvenir. You can also make a tissue paper made from old magazine or a paper grocery bag. You can also make different products to complete your recycled craft collection, all you have to do is find the best molder to your project and you can make the best recycled product from old news paper.
Why do we have to twist news paper before weaving? answer: weaving news paper will give strength to the product as we do the weaving unlike fold only, it has a tendency to break or tear easily.
For basic twisting of news paper, please refer to above links for step by step folding and twisting of newspaper. The weaving procedure in making a news paper tissue holder is very easy, so fun and exciting. Do this project together with your whole family during your bonding moment.


<img src="holder.gif" alt="tissue paper holder made of recycled news paper " />
Tissue Holder made of recycled news paper
Folding and Weaving Procedure:
<img src="holder2.gif" alt="procedure in making tissue paper holder made of recycled news paper " />


  •  Forming the bottom using twisted news paper. Stick with glue. Folding four times will add strenght to the base of our tissue paper holder.
  •  Use a molder to form the shape of a tissue holder. You can't make a good shape without a pattern molder, so using a round shaped container is a must.
  •  Make a cover the same procedure as the body but leave a hole at the center. Cover is a bit larger than the body of the tissue paper holder.
  •  Coat with varnish for finishing.
This project is also a good business idea. I knew someone who made this idea to start her own recycling business. She makes hats, bags, jars, lampshades and other products made of recycled news paper. It is true that there is money out of garbage so let's try making a living by saving our mother earth!


Making Swan Decor out of Paper


I'm so in-love with recycled handicraft because by recycling, we could convert trash into a beautiful, useful products. Today, I'm going to teach you how to make a decor from old magazines and news papers. It's another DIY craft to be enjoyed doing by the whole family.

Materials needed:

Old magazine pages
Scissor
Glue

Procedure:
<img src="fold.gif" alt="procedure in making swan out of magazine pages " />
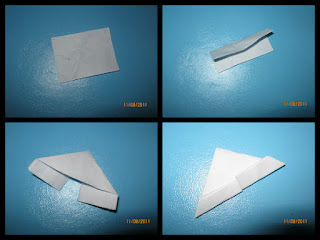
  • Cut a small rectangle from a magazine's page.
  • Fold like image 2,3,4...
    <img src="swan.gif" alt="procedure in making swan out of magazine pages " />
  •  Connect each folded paper to make a base. Connecting folded paper can make different shapes.
The provided images are folding and connecting instructions only.Connect all the folded papers and make your own design like swan,vase and others. You can make different products by learning the basic folding of magazine pages. Making paper swan is not so easy, it needs several trial and error to make it perfectly. Connecting the folded paper maybe so confusing so be patient in learning the step by step procedure in making swan from recycled magazine.

Different Ways to Recycle old T-shirts


No matter how old or worn out your shirt is, there still different ways to reinvent it. Recycling T-shirt is a hobby that could give you so many ideas. I was amazed when I searched the internet about T-shirt recycling or up cycling. There's so much ideas that you can use to recycle old t- shirts. I tried to make my own T-shirt recycling ideas ang this is what I'm gonna share to you my dear readers.
A T-shirt is usually made of cotton, a durable fabric that you can reuse even after it's worn out. I only picked some easy ways to recycle a shirt so I could make this post fast and simple.  I cut my old shirt to 1/2 inch thick and those strands lead me to make different recycled crafts like what you see on the picture.
different ways to upcycle,recycle and reinvent t-shiry
  • Cord- the strands can be used as cords of different purposes. Sometimes we need a cord to tie something like packages, a cord to replace a duster's straps or a cord of mosquito net. Just roll the straps and keep for future purposes.
  • Braided jumping rope- make your own jumping rope to lose weight or to be played by your kids. The cotton fabric is heavy when braided so its perfect to jump on it.
  • Braided Belt- braid shirt strands to fours. Braided T-shirt strands is best to make a belt. You can match it with your pants or dresses. It can also be a kid's fashionable belt.
  • Tied net- tie the strands together one by one and make your own basketball ring's net. Tying is very easy just look at the image to catch the idea. Tied shirt cords can also be made a swim suit tops or a simple head band. It's definitely no stitching needed.
  • A yarn for crochet- you can also make yarns from the strands you made. An ideal thickness to make a yarn for crochet is 1/3 inches. From these shirt yarns you can crochet rugs, hair bands, purses, bags and floor mats. You can also make bonnets out of shirt strands.
  • Bolero (blazers)-the leftover shirt top can be kept to be your blazer or bolero in tagalog. This can be your sleeveless tops to keep your arm flesh from exposure.  

  • Aother way to reinvent and to recycle T-shirt is to weave the strands. From weaving, you can make bags, doormats, vase mats, pot holders, pouches and purses. The idea of recycling old shirts is not limited as long as your heart is engaged into recycling. Always remember that waste materials can be reinvented just reduce, reuse and recycle.

DIY foldable eco friendly shopping bag

dig foldable shopping bag
Here at Crafty Mom Ideas, we give attention in making DIY products to help all interested mothers out there to learn how to make basic products we need in our house holds. This post is very special because it concerns our environment and how to protect it.
I'm so glad that authorities in most provinces and cities are now strictly implementing the "no plastic bags" policy in all merchants. It should have done a long time ago, maybe it did not become this worst. We all knew that plastic bags are non biodegradable, it can be very harmful to our environment. It takes 15 years or more before these plastic bags are totally decomposed.The tendency is to accumulate these wastes in our environment. It's very possible that we can create another mountain, a mountain of garbage! I'm inspired to make this article, why? Because this is another helpful DIY project. It's something we should learn to. I know some of you see things like what I do.I hate paper bags! I hate it because it's messy,it's not durable, and most of all it's not comfortable to handle.Eco-friendly bags are good but do I always have to buy it every time I buy groceries? Well, I have a simple solution here, to make DIY Eco shopping bag.This Eco shopping bag is something different. It's durable,reusable, handy and foldable. You can use new fabrics but I suggest,use recycled fabrics to make a double purpose: one is to save money and the other one is to recycle. Recycling is a very good hobby, it can do a lot to save our environment to its speedy destruction.This is why I created this DIY recycling craft blog, I am an advocate, I want to teach and encourage people to be one too.

Things needed to make a foldable shopping bag:


  • 2 pieces 15x20 inches used cloth. You can also quilt assorted used clothes.
  •  2 pieces 5x20 inches cloth for straps
  • 5x30 inches cloth to hold straps 
  • 12 inches zipper 


Procedures :


  • Connect the ends of the three sides of your 15x30 cloth. 
  • Double the stitch to ensure durability. 
  • Fold the straps lengthwise , the edges inside. 
  • Sew both sides.
  • Attach the straps by inserting the ends to the holder. 
  • Position them 5 inches below the mouth of the bag. 
  • Attach the zipper at the face of the bag, please refer to the picture to figure out how it should be attached and 
  • Lastly, fold and sew the mouth of your bag and your done!

DIY Flower vase made of news paper

I have several posts about making crafts from old news paper and I just want to add one more. This is a simple DIY  flower vase procedure using old news paper.  I’ll make this post clear and simple, coz it's just an additional post.  You can find complete tutorial about twisting and folding a news paper to make a recycled craft like this in my previous posts.
I used a pattern here which is an old boring vase made of glass. Unfortunately,  I wasn't able to use a molder because it couldn't be removed after because of  its  curve.
I think I don't have to upload here the step by step procedure coz I believe that you,  especially my regular visitors already knew how to do it,  but for some who are new to my site,  please feel free to browse the content of my blog.
The flower I used to design the vase is made of folded paper and cut to form a flower and the small button of my old blouse added some impact on it.  This recycled vase is a good idea for school projects with recycling theme. 
This is a rush post since I am using my newly installed Blogger mobile application. So guys,  bear with my errors I am just trying to familiarize myself with this application.

Best SOS idea, DIY Emergency Lamp for unexpected long brown-outs


<img src="lamp.gif" alt=" procedure in making emergency lamp out of salt and oil" />
YoandaPh caused a severe damage in Meralco connections in our province. We had no power for amost 3 weeks. All our gadgets, flash lights and rechargeable lamps were badly drained and so we had to find ways to atleast have a little light at night.

Good thing that I still remember my grade school  science experiment, making emergency lamp using salt and oil. Learning how to do this craft is necessary especially during calamities causing unexpected long brown-outs. This is the reason why I want to share here the procedure to make a recycled emergency lamp to give a little SOS tip. We can make this recycled emergency lamp anytime using materials we commonly have inside our house.

The DIY procedure of recycled emergency lamp is really easy to do, it's also fun doing it with your kids so you'll have another reason to  bond. My six year old daughter enjoys doing this craft, but I make sure to always assist her especially when lighting the lamp, just always keep an eye to your kids when making this craft. Doing this craft, you have to prepare the following materials:

  • 1 pc. tin can (wide and short preferably)
  • a piece of cotton
  • a match stick or if you don't have one, you can use a toothpick or any other wood stick.(should be an inch taller than the can
  • used cooking oil
  • rock salt or fine salt
  • a lighter to light the lamp

Procedure:

  • Clean the can and dry it with cloth
  • Put the salt inside the can about 3/4 full.
  • Add used cooking oil a little higher than the salt.
  • Wrap the entire stick with cotton. The tip should look the tip of a cotton bud.
  • Dip the entire stick in used cooking oil and then dip it in the middle until you reach the bottom of the can.
  • Using a lighter, light your emergency lamp

You can now use your recycled emergency lamp made of recycled tin can and used cooking oil. This lamp can be used overnight. If the lamp failed to produce light, it's just an indication that the oil is already drained  so you have to refill it with another used cooking oil and you can use it again. You also have to replace the wrapped stick if you think you needed to. I just want to remind you to always keep this lighted lamp out of reach of children and from easy to ignite materials such as papers, plastic, cloth and etc. I hope this article will help you in your waste materials and I would appreciate if you leave some comments, tips and suggestions below. Thank you everyone for visiting and reading my blog post about DIY recycling tin can and used cooking oil to emergency lamp.

DIY Shoe Rack from Recycled Sack

diy recycling shoe organizer
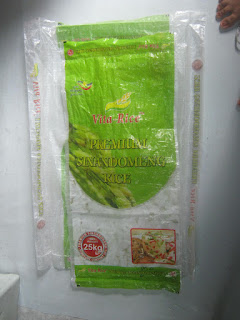
What is  sack? It is a common packaging material used as a rice container. Sack is made of straw and plastic which is proven durable materials. The sack lives for years and it is non-biodegradable. So if we throw it together with our everyday trash, it can take up to 10 to 20 years before it is totally decomposed which is not good for our environment. Since waste reduction and recycling are partners in taking care our environment, we should think of ways on how to recycle sacks. We may not totally eliminate them but we can always re-use them as a recycled product.

 Do you have a bulk of shoes and slippers below your stairs or doorstep? Sometimes, you inevitably stepped on those shoe or slipper pile. It's very annoying to see those mess on your way but you can't keep those things because you're using them regularly. There's a solution to your problem because you can hang them right beside your stair or doorstep.

Today I'm going to show you how to recycle sacks into a hanging shoe rack. Hanging shoe rack is very convenient to use. You could easily pick your desired shoe and at the same time you can save a lot of space in your home. Let's begin with the step procedure by preparing these materials:
  • 1 whole sack (preferrably rice sack)
  • scissor
  • sewing machine
  • tape measure

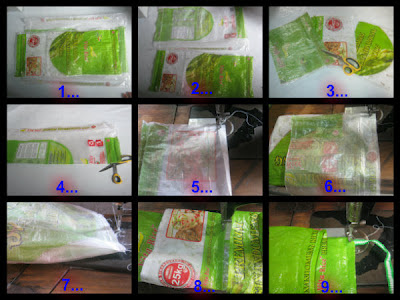
Procedure: Follow the images as you read the step by step procedure.
diy shoe organizer
  • Step 1 - Get a whole rice sack.
  • Step 2 -  Divide the sack into two unequal parts. One half is 13 inches and the other half is 21 inches. You should not cut the sack default length. These will serve as pocket layers.
  • Step 3 - Divide the smaller half in to 3 equal parts. 
  • Step 4 - Divide the wider half into two equal parts lengthwise. 
  • Step 5 - Now fold the edge of each layer at-least half an inch (the 3 equal sized) then stitch to prevent ripping. 
  • Step 6 -  Face to face the two lengthwise and sandwich the layers and sew.
  • Step 7 - Sew the the bottom to lock fold-in the two excess sides and revert it.
  • Step 8 - Sew the bottom of each layer.
  • Step 9 - Attach a handle or a holder at the top of our product. Fold-in the edges, sandwich the holder then sew.
Now we're done with the hanging shoes rack made of recycled rice sack. 

Visit Amazon for more shoe organizer designs. 

DIY Coin Purse from remnants of Cloth or used old cloth


The coin purse is something that's always with us on our daily lives. We use coin purse when  shopping, going to work or even attending school. The purpose of the coin purse is to exclude coins from the entire money so it wouldn't be too difficult to get if you have to pay coins especially if you're going to pay the fare because there are  drivers who doesn't give change due to lacking of coins. So we always carry a coin purse wherever we go. By doing this, we don't need to shake the entire bag or wallet to see if there were coins inside. This post will teach you how to make a coin purse from recycled waste materials.

When sending my kids to school, I always make sure that they have enough coins to pay for their needs like fare, food and drinks. My kids are too shy to ask for a change for their money if they had to, so I should always give them coins for them to pay just enough for a certain thing or service they needed. This is why they always have a coin purse hanged on their shoulders. It's just a simple DIY procedure for recycled coin purse that I made from used old clothes that looks like just a necklace. I just put an ID holder to make sure that the recycled coin purse wouldn't be lost or misplaced because most kids are too careless when handling money so we should assist them and teach them how to be careful with it.

This blog is about making a simple coin purse out of used old cloth but you can also use remnants of left-over cloth here.You can also use Old pants here for your boy's recycled coin purse. It's so easy to make a recycled coin purse from recycled cloth, you just have to follow only 6 steps.


step 1
step 2
step 3


step 4


step 5
step 6

  • Step 1 - Cut 4 pieces of recycled cloth, 2 for the outer fabric and 2 for the lining
  • Step 2 - Insert the zipper between the lining and the outer fabric. Two fabrics should face each other.
  • Step 3 - Revert the fabrics and do the same procedure with the other set of fabrics.
  • Step 5 - When stitching, You have to open the zipper so you can revert the coin purse and you have to begin with the outer fabric. Two faces of fabrics should face each other when you stitch or sew them. Look at the image no. 5 for the result. You have to stitch the lining too but this time, you have to make a clean stitching here because you can't revert it like what we did on the outer fabrics.
  • Step 6 - Insert the lining inside the purse and you're done with making a simple recycled coin purse.
 I made these two designs of recycled coin purses , the red is the one I made for my girl. The materials I used here is the left-over cloth from my bed sheet. The blue one is the purse I made for my boy. The materials I used here is the left-over fabric of my husband's used old pants which I cut long ago to make a short pants. Don't forget to add holder for each coin purse so you can add a neck tie to hang the purse on their neck so it wouldn't be lost or misplaced.

girl's recycled coin purse boy's recycled coin purse

DIY Recycled Lunch Bag out of recycled old clothes

diy used clothes recycled to lunch bag 
6927";
Lunch bag is very useful to our kids in school. Lunch bag should be light weight so it's easy to carry  for our small kids, it should also can stand alone to prevent the foods and drinks to mess inside. A lunch bag is far different to lunch box when it comes to convenience and food safety. As for my kids, especially my girl, they prefer to bring lunch bag than bag because they could hang it on their shoulders and it is so convenient to bring anywhere, anytime. I collected some facts why using a lunch bag is much more convenient than using a classic lunch box:


   Lunch Bag                                                Lunch Box
. easy to carry                                                                  .  noisy box
. light weight                                                                     . childish like
. tightly closed                                                                  . opens accidentally
. unbreakable                                                                   . easily breaks
. fashionable                                                                     . a lunch box looks like attache case

These maybe are the reasons why my 4 year old, fashionable daughter doesn't want to carry her lunchbox in school. I'm so glad to learn the steps in making a lunch bag for my kids. It's comfortable to carry especially  for my daughter who only needs to bring meal alone in school because all of her things are always being left inside the classroom. I understand her why she always wants a lunch bag which is like just a normal  but fashionable bag.

I've found making a lunch bag so fun and easy, well of course, everything that I do for my kids is always fun form me. Before proceeding the procedures, you have to prepare all the materials needed to make a bag. In lunch bag tutorial, I used a recycled cloth which is my old used skirt. I prepared these materials with measurement below for the lunch bag pattern.
Materials:
  • strap - 2x 30 inches cloth
  • ribbon cord - 1 1/2 x 30 inches cloth
  • Body (front and back) - 2 pcs. 8x10 inches cloth
  • Body (sides) - 2 pcs. 5x10 inches cloth
  • pocket - 8x7 inches cloth
  • bottom - 8x7 inches cloth
  • for designs - different colors of threads
  • garter
  • stick for inverting the strap and ribbon cord
  • sewing machine or stitching kit
  • tape measure
  • scissor
  • marker for drawing designs
Procedure:
lunch bag diy procedure
  • Connect all parts: the front, back, sides and bottom of the bag. Don't forget to attach the pocket when sewing the front part. a garter should already inserted when sewing the pocket to the body.
  • Attach the body  to the bottom. You can make an inside lining if you want. Just choose a cloth best for it like gina or satin fabrics. The measurement for the lining should be exactly the same as the body of the bag.
  •  Fold the mouth of the bag  at 1/2 inch then sew. 
  • Prepare the ribbon cord. Simply fold and stitch both ends to the middle. Leave at least one inch for inversion. Revert the cord using a stick and insert in to the folder mouth of the bag.
  •  Prepare the star by folding and stitching. Revert using a stick and attach it on both sides sides of the bag's mouth. 
  • For the embroidered design, I used back stitching stroke for the heart and the letters. You can use other strokes you want, I just did the simplest. Choose colorful yarns or threads. On this project, i embroidered my daughter's name "Clavern" to make it personalized.

Recycling ideas for egg shells


The main ingredient in eggshells is calcium carbonate (the same brittle white stuff that chalk, limestone, cave stalactites, sea shells, coral, and pearls are made of). The shell itself is about 95% CaCO3 (which is also the main ingredient in sea shells). The remaining 5%includes calcium phosphate and magnesium carbonate and soluble and insoluble proteins(source:http://wiki.answers.com/Q/What_are_egg_shells_made_out_of) 
 Egg shells are common kitchen waste materials we usually throw in our garbage.It's about time that we learn how to recycle this thing in order to minimize our everyday wastes. We should know that egg shells can be useful in so many ways.

After watching my favorite informative show in QTV channel 11 which is Good news with Vicky Morales, I learned that there are so many uses of egg shells. It actually can help us in our everyday house hold chores, except for that fact that egg shell is a very useful material in school arts.I've learned some procedures on how to recycle egg shells into a useful product. I will enumerate some of the things as I remember from watching the show.

Uses of Egg Shells:
  • Egg shell as sink strainer- we all have sink strainers but despite of having one, we couldn't prevent our sink it from clogging due to some waste residue from our dishes. We can make egg shells as strainer when broke into smaller pieces. All sticky residue will then mix to the shells, it will also serve as a dirt magnet when passed thru the sink's tube. Egg shell won't clog the sink passage for it dissolves in time.
  • Egg shell as bitter taste remover- try it with strong coffee mix as example. When fine pieces of egg shell are mixed with the coffee, the bitter taste will be removed.
  • Vinegar Enhancer- simply add fine egg shells to the vinegar and leave for 2-3 weeks or until the shell dissolves. The minerals that egg shell has will mix to the vinegar so you would have a healthy vinegar.
  • Egg shell as art material-Paste fine shells to a drawing and enhance it with water color. You can also design a bottle or a jar by pasting fine pieces to it and paint it with different colors.
The above procedures are best help for us to know what's the best egg shell garbage disposal.

    DIY recycled hand Puppet out of socks


    Recycling and doing simple craft out of waste always fulfills my advocacy which is to make our environment less waste by recycling used materials. I always have guilt feeling every time I had to throw a thing in the garbage. I really believe that a certain thing always has it's value no matter how old, used or new a thing is. It's just a matter of creativity and love for our mother earth.


    After cleaning my kid's sock closet days ago, I already have have finished a a project which is recycling used socks to a hair pony tail. Now, with this article, I’m going to show you how an old sock will transform into a creative DIY craft or handicraft: a sock puppet. My kids really love puppets that's why I have different hand puppets at home. I used to talk to them with my hand puppet. It always eases their tantrums and sometimes, hand puppet talk is a way for my kids to say "sorry" whenever they committed mistakes. During our bonding time, we used to play with hand puppets and we always enjoy talking and playing with our hands impersonating cartoon characters. Now, I'm gonna share a simple way to recycle your old socks by making a cute hand puppet.

    diy hand puppet out of used socks


    I chose to design a puppet dog from a bulk of old socks I sorted days ago. Since the common colors of my kid’s socks are a combination of gray and white, I came up with the idea of making a cute gray dog puppet. This combination is also good for cows, cat and other puppet animals. Doing a puppet from recycled materials is fun and easy. You can make this project together with your kids during your bonding moment.

    In doing this project, you have to prepare the following materials:

    • 3 pcs. of used old socks with the same colors
    • scissor
    • needle and thread
    • marker
    The procedure in making a sock puppet is very easy, even kids will enjoy doing it with their parents. Parents should guide their kids with the procedure especially when they’re handling a scissor and a needle.

    Procedure in making a puppet from recycled socks:


    • Get 2 pcs. Of used old socks. Choose color that coordinates with each other to make a dog like image.
    • Cut the socks; make one bigger than the other one. The upper part of the mouth is bigger than the lower part.
    • Connect the two sides of each sock to form the mouth of the puppet. This will serve as the mouth of our puppet
    • Get another sock to make the body of our puppet, cut the toe nail part.
    • Attach the body to the mouth of our dog puppet.
    • Make a triangle shape pair of ears and attach them to both sides of the head.
    • Mark the eyes and nose using your marker. If you want, you can use buttons to make eyes.
    • And there you have it! A dog puppet handicraft from used old socks.

    Now, don't think of throwing your used old socks in the garbage. Remember there's a lot of productive ways to make these wastes still useful. Always remember: segregate wastes, re-use and recycle. Minimize wastes by making useful products out of it.
    Article about recycling old socks you may also like: How to make a pony tail from used old socks.


    How to make Bags made of straw


    A drinking straw is a short tube intended for transferring a beverage from its container to the mouth of the drinker by use of suction. A thin tube of plastic (such as polypropylene and polystyrene) or other material, straight or with an accordion-like living hinge, it is employed by being held with one end in the mouth and another end in the drink. Muscular action reduces air pressure in the mouth, whereupon atmospheric pressure forces the drink up the straw
    . (source: http://en.wikipedia.org/wiki/Drinking_straw)
    In the Philippines, we use drinking straw in past food, variety stores and restaurants for drinks. Everyday a large amount of drinking straw is being thrown in the garbage that contributes to a large amount of waste in the country. I'm so glad that people get more aware of the increasing amount of trash which is very alarming and dangerous to environment. People now are more determined to their advocates about recycling and minimizing wastes.

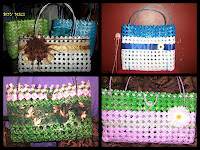
    Lately, I discovered another DIY craft, a creative design of recycled handicraft from waste. It is made of drinking straw that we usually found in a sari-sari (variety) store or canteen's garbage. Unfortunately, I haven't learned yet the procedure ,what I learned about this recycled craft is that it is made by folding recycled used drinking straws. As you see all those images above, it comes in various designs, colors and sizes which are very attractive, thanks to my FaceBook friend Lea who gave me her approval to upload her artworks here in my blog. She's also willing to teach me how to do the procedure of making bags from straw but as of now, we both have to find time to do this. I wrote this blog because I want to tell the whole world that there is a beautiful craft out of used straws, and i hope like me, my readers also get some inspirations to give attention to small things like straw, that if we only use our creative imagination, we could make a hobby or better yet...a living out of garbage and waste materials.

    Different designs and style of woven drinking straw bags. These bags are so fashionable and so light to carry since it is made of light material. There are designs perfect women, ladies and girls.


    The materials used on the above sample is junk food wrapper. Assuming that you are weaving a drinking straw, the procedure is what you see on the above images. Start from a single fold then add another as you go wider. Weave as wide as you want until you weave a bag of your design.


    DIY Hair Pony Tail out of Recycled Socks

    It's kid's drawers cleaning time! I had to separate all the good ones from the old ones. the result: a bulk of used old socks! These socks are made of thick, soft fabrics that's why I had a guilt feeling thinking that I had to throw all of them. My heart says..."don't throw them, instead think of a way to make these used socks useful."...and so I followed my heart. I started to remember what I always tell to myself whenever I do sorting things like this: reduce...re-use and recycle. Now I will show you how to make another DIY craft from used old socks, a hair pony tail.

    Making this project is very simple, you just need to provide all the materials needed to make a hair pony tail made from used old socks. Moms like me, with long hair and always busy doing household chores, never been comfortable with laid hair while working at home. I want a bulk of hair pony tail in my beauty kit. Since I love recycling, I asked my self "why not make pony tails out of these waste socks". So here I am, typing my keyboard, complete with images to make a tutorial blog about recycling used old socks to hair pony tail.

    Materials Needed:
    • used old socks, plain of printed
    • scissor
    • garter to be inserted inside the pony tail.
    • sewing machine or sewing kit if don't have one.
    • stick for inverting the sewed product

    used socks recycling
    Procedure in making a hair pony tail out of socks:
    diy socks recycling
    • Get 1 pc. of used old socks
    • remove both ends
    • divide in to two parts
    • sew the reverse side the revert using a stick
    • attach the end to connect and make a round shape
    • we're done!
    I used gray and white for this project but you can choose any color you want from the bulk of used old socks you sorted. If you have girl"s socks with colorful designs, it would be best fit to this project. I am sure your kids would love to wear it knowing that you made it for them with love. So start sorting and be creative in making products like this. Goodluck to your new found hobby! Remember that throwing things to garbage doesn't mean cleanliness, real cleanliness comes from the heart who loves the environment and mind that always thinks what's good to our mother earth. Recycling benefits not the environment but Us!

    DIY X-ray Film recycling


    Handicraft is already a part of my everyday routine, without it my life wouldn't be complete. Making recycled handicraft became my obsession so I really spend time researching about different handicrafts made from recycled materials.

    Last week, my husband spent a few days vacation in Cabanatuan City in Nueva Ecija to celebrate with his family for his mother's 79th birthday. He was so surprised to discover that his brother is also in recycling. My brother-in law makes butterfly wall decors from recycled x-ray films. Since my husband supports my advocacy in recycling waste, he was so excited to tell the good news to me and of course, I was so excited to instruct him to learn the procedure on how to recycle x-ray film to a butterfly wall decor and it was not as hard as I thought. This tutorial is DIY craft, which means you can do it your self.

    diy x-ray film recycled to wall decor

    diy x-ray film recycling

    diy x-ray film recycling

    diy x-ray film recycling

    These butterflies move like real as shown on the video.


    Materials needed in making butterfly wall decor:

    •  x-ray film
    • round wood or tree branch
    • plywood
    • paint
    • paint brush
    • sand paper
    • nylon cord
    Procedure in making butterfly wall decor:
    • prepare the platform (plywood). Paint a flower on it.
    • draw a butterfly image on the x-ray film.
    • paint the butterfly with different colors.
    • cut the butterfly and put a body using the painted branch.
    • make the antennae and and legs using a thin nylon cord.
    • connect the finished butterfly on the platform.
    • put a triangular holder at the back of the platform then hang the butterfly wall decor.


    DIY Simple and Non-Zipper Pillow Case


    Making simple pillow case is very easy,it's a DIY craft or do it your self procedure.. You just have to learn the basics in sewing. This project is for 23x16 pillow size. I always use satin fabrics for my pillows because satin won't tangle my hair during sleep but it's up to you whatever fabric you want to make as pillow case.This procedure is very simple, all you need to do is provide the fabric which is 53 inches tall and 18 inches wide. You can use a recycled cloth for this project, all you just have to  attach the pieces of recycled cloth then sew to make a 53 inches tall fabric then follow the step by step in making a simple pillow case.


    diy procedure pillow case
    Procedure to sew a pillow case:

    • Measure the fabric at 53x18 inches
    • fold both ends two times with 1/2 inch each fold then sew
    • Fold the first fold on the image, this will serve as the holder of the pillow since we don't use a zipper here.
    • Make the second fold as you see on the third image.
    • sew the both edges
    • make sure to measure every fold correctly
    • Now we're done with the simple pillow case
    This is a simple pillow case, simple because we did not put so much design and this pillow case has no zipper. We only fold 6 inches to hold the pillow inside the case.

    Random Posts

    Blogger Tips and TricksLatest Tips And TricksBlogger Tricks